Difference between revisions of "Flat Layout"
(Created page with "==Description== right|600pxThe flat layout plug-in allows an unbent model of the part to be labeled with the start, center, and end bend lengths, the rotatio...") |
|||
| Line 1: | Line 1: | ||
==Description== | ==Description== | ||
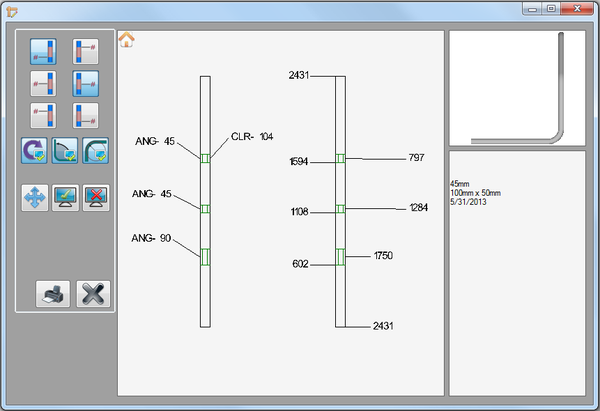
| − | [[File:fl02.png|right|600px]]The flat layout plug-in allows an unbent model of the part to be labeled with the start, center, and end bend lengths, the rotations, angles, and/or center line radius values. Individual labels can be hidden and moved, if necessary. The part image with labels, the 3D model, and the part information can be printed out. | + | [[File:fl02.png|right|600px]]The flat layout plug-in allows an unbent model of the part to be labeled with the start, center, and end of bend lengths from either end of the tube, as well as the rotations, angles, and/or center line radius values. Individual labels can be hidden and moved, if necessary. The part image with labels, the 3D model, and the part information can be printed out. |
| − | In the flat layout window, the label controls and the print button are in the left panel. The part display frame is in the center of | + | In the flat layout window, the label controls and the print button are in the left panel. The part display frame where the 2D, unbent model of the part is shown and where the labels will be applied is in the center of the window. There are two images of the same part shown - the left part will be labeled with the rotations, angles, and CLR while the right part will be labeled with the length values. In the right panel, a small 3D model of the bent part is shown along with the part's name, die, material, and date of creation. |
| Line 15: | Line 15: | ||
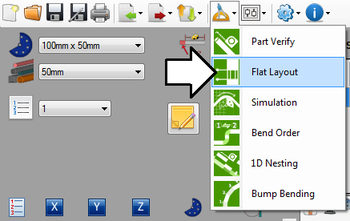
To access flat layout, click on the tools menu on the main tool bar. Click the flat layout option in the drop down menu, as shown below. | To access flat layout, click on the tools menu on the main tool bar. Click the flat layout option in the drop down menu, as shown below. | ||
| − | [[File:fl01.png]] | + | [[File:fl01.png|350px]] |
===Controls and Options=== | ===Controls and Options=== | ||
| − | |||
====Adding Labels==== | ====Adding Labels==== | ||
| + | In the left panel, the first 6 buttons represent | ||
====Moving Labels==== | ====Moving Labels==== | ||
Revision as of 08:15, 31 May 2013
Contents
Description
The flat layout plug-in allows an unbent model of the part to be labeled with the start, center, and end of bend lengths from either end of the tube, as well as the rotations, angles, and/or center line radius values. Individual labels can be hidden and moved, if necessary. The part image with labels, the 3D model, and the part information can be printed out.
In the flat layout window, the label controls and the print button are in the left panel. The part display frame where the 2D, unbent model of the part is shown and where the labels will be applied is in the center of the window. There are two images of the same part shown - the left part will be labeled with the rotations, angles, and CLR while the right part will be labeled with the length values. In the right panel, a small 3D model of the bent part is shown along with the part's name, die, material, and date of creation.
How To
Start Up
To access flat layout, click on the tools menu on the main tool bar. Click the flat layout option in the drop down menu, as shown below.
Controls and Options
Adding Labels
In the left panel, the first 6 buttons represent

