Difference between revisions of "Linear 2D Designer Quick Start"
(Created page with "=='''Add Bend'''== '''Adding a bend''' can be done two different ways: '''1.)''' While the part is being designed, '''each click''' of the mouse will '''place a new bend'''. ...") |
|||
| (14 intermediate revisions by the same user not shown) | |||
| Line 6: | Line 6: | ||
[[File:2daddbend1.png|500px]] | [[File:2daddbend1.png|500px]] | ||
| − | '''2.)''' After the finish button has been clicked, the '''add bend button''' [[File:addbend.png]] will become available. Click it to add a new bend. Once clicked, the part will be in design mode again and a blue line will be attached to the end of the part. In the part display, click the new end location of the part. If necessary, continue to pick further points to add more bends. | + | '''2.)''' After the finish button has been clicked and the part is not currently being designed, the '''add bend button''' [[File:addbend.png]] will become available. Click it to add a new bend. Once clicked, the part will be in design mode again and a blue line will be attached to the end of the part. In the part display, click the new end location of the part. If necessary, continue to pick further points to add more bends. |
| Line 12: | Line 12: | ||
=='''Remove Bend'''== | =='''Remove Bend'''== | ||
| − | While the part is being designed, the '''undo''' last [[File:undo.png]] button can be clicked to remove the last bend on the part. | + | While the part is being designed, the '''undo''' last [[File:undo.png]] button can be clicked to '''remove the last bend''' on the part. |
| + | |||
| + | [[File:2dundolast.png|600px]] | ||
| + | |||
| + | |||
| − | |||
=='''Adjust Lengths'''== | =='''Adjust Lengths'''== | ||
| + | To '''adjust the length''' of a straight section, enter a new value into the corresponding length field in the left panel. | ||
| + | |||
| + | [[File:2dlengths.png|550px]] | ||
| + | |||
| + | |||
| + | |||
=='''Adjust Angles'''== | =='''Adjust Angles'''== | ||
| + | '''Bend angles can be adjusted''' by '''entering new angle values''' into the angle fields in the left panel. | ||
| + | |||
| + | [[File:angles2d.png|550px]] | ||
| + | |||
| + | |||
=='''Adjust Rotation'''== | =='''Adjust Rotation'''== | ||
| + | Parts created using this designer can have either '''no rotation or 180° rotations'''. In the left panel, the second column in the entry fields has a series of check boxes, one for each bend. '''To add a 180° rotation''' to a bend, click the check box. When the box is not checked, the bend will have no rotation. | ||
| + | |||
| + | [[File:2drotate.png|600px]] | ||
| + | |||
| + | |||
| + | |||
=='''Dimension Types'''== | =='''Dimension Types'''== | ||
| + | When creating parts in the linear 2D designer, '''all dimensions are measured from the apex of each bend'''. In this specific designer, there is not option to change this. | ||
| + | |||
| + | [[File:distApex.png|250px]] | ||
| + | |||
| + | |||
| + | |||
=='''Start Over'''== | =='''Start Over'''== | ||
| + | '''To completely start over''' and delete all bend information, click the start over button. [[File:startover.png]] | ||
| + | |||
| + | '''''Take caution''''' when using this function. Once a part has been started over, its information cannot be retrieved again. | ||
| + | |||
| + | |||
| + | |||
=='''Finish'''== | =='''Finish'''== | ||
| + | To '''finish a part and exit design mode''', click the '''finish button'''. [[File:checkflag.png]] Note: This is temporary. Further edits can be made to the part after this button has been clicked. To resume editing, click the add bend button. [[File:addbend.png]] | ||
| + | |||
| + | |||
| + | |||
=='''180° Bends'''== | =='''180° Bends'''== | ||
| + | In the linear 2D designer, 180° bends are handled in a slightly different fashion. | ||
| + | |||
| + | '''To add a 180° bend''', first add a bend of any angle value. Once the bend is added, locate it in the entry fields in the left panel. In the angle field for the specified bend, enter "180". | ||
| + | |||
| + | [[File:2d180.png|600px]] | ||
Latest revision as of 14:52, 29 May 2013
Contents
Add Bend
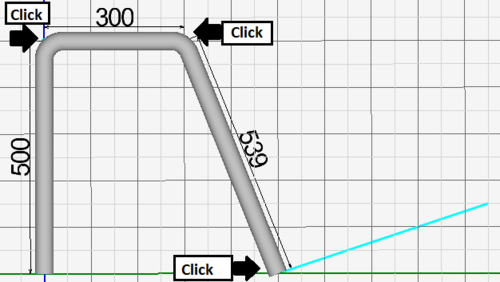
Adding a bend can be done two different ways:
1.) While the part is being designed, each click of the mouse will place a new bend. (The start and end length of the part are an exception.)
2.) After the finish button has been clicked and the part is not currently being designed, the add bend button ![]() will become available. Click it to add a new bend. Once clicked, the part will be in design mode again and a blue line will be attached to the end of the part. In the part display, click the new end location of the part. If necessary, continue to pick further points to add more bends.
will become available. Click it to add a new bend. Once clicked, the part will be in design mode again and a blue line will be attached to the end of the part. In the part display, click the new end location of the part. If necessary, continue to pick further points to add more bends.
Remove Bend
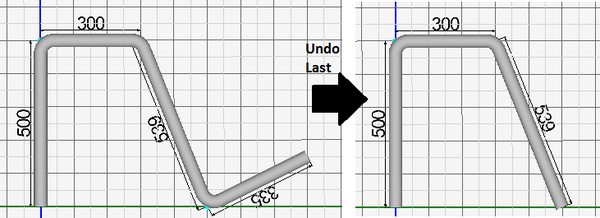
While the part is being designed, the undo last ![]() button can be clicked to remove the last bend on the part.
button can be clicked to remove the last bend on the part.
Adjust Lengths
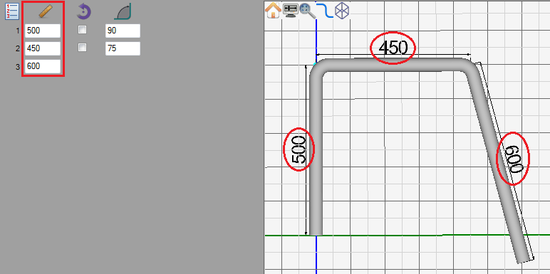
To adjust the length of a straight section, enter a new value into the corresponding length field in the left panel.
Adjust Angles
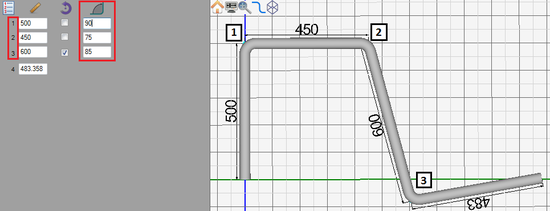
Bend angles can be adjusted by entering new angle values into the angle fields in the left panel.
Adjust Rotation
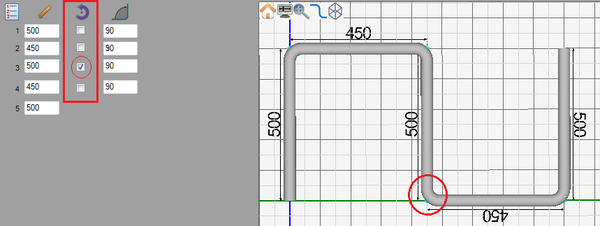
Parts created using this designer can have either no rotation or 180° rotations. In the left panel, the second column in the entry fields has a series of check boxes, one for each bend. To add a 180° rotation to a bend, click the check box. When the box is not checked, the bend will have no rotation.
Dimension Types
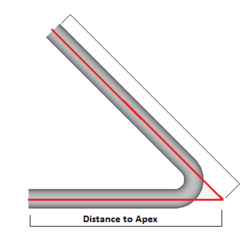
When creating parts in the linear 2D designer, all dimensions are measured from the apex of each bend. In this specific designer, there is not option to change this.
Start Over
To completely start over and delete all bend information, click the start over button. ![]()
Take caution when using this function. Once a part has been started over, its information cannot be retrieved again.
Finish
To finish a part and exit design mode, click the finish button. ![]() Note: This is temporary. Further edits can be made to the part after this button has been clicked. To resume editing, click the add bend button.
Note: This is temporary. Further edits can be made to the part after this button has been clicked. To resume editing, click the add bend button. ![]()
180° Bends
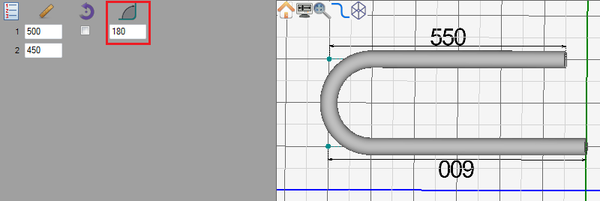
In the linear 2D designer, 180° bends are handled in a slightly different fashion.
To add a 180° bend, first add a bend of any angle value. Once the bend is added, locate it in the entry fields in the left panel. In the angle field for the specified bend, enter "180".
