Difference between revisions of "Import"
| Line 81: | Line 81: | ||
| − | *'''Die menu:''' The die chosen here will be the default die that is set in the die library. | + | *'''Die menu:''' The die chosen here will be the default die that is set in the die library. This die will not necessarily be generated in the bend chart once the part is defined (Unless a part is defined by selecting straight line features - see below). Choosing a different die here '''''will not''''' change the die to the entire part. See the [[Import#Bend Chart|Bend Chart]] section for information on changing each bend's die after defining a part. |
| + | |||
| + | If a part is defined by '''''only selecting straight line''''' features, the die chosen here will be generated in the bend chart after the part is fully defined. | ||
| + | |||
| + | [[File:import20.png|800px]] | ||
| + | |||
| Line 133: | Line 138: | ||
====Bend Chart==== | ====Bend Chart==== | ||
| − | [[File:import11.png|right]]Once the part is fully defined using either of the defining methods, the bend information along with the bend's CLR and the die will be listed in this chart. Each row will represent a bend. The first column list the bend number, the second column will list the CLR of the bend, and the third column will list the die for that bend. | + | [[File:import11.png|right]]Once the part is fully defined using either of the defining methods, the bend information along with the bend's CLR and the die will be listed in this chart. Each row will represent a bend. The first column list the bend number, the second column will list the CLR of the bend, and the third column will list the die for that bend. The die automatically chosen here will be the best fit for the bend. |
The ability to choose a die for each individual bend will be available here. '''To change a bend's die''', click on the die name in the bend's row and click the drop down menu. Select a die from this list. | The ability to choose a die for each individual bend will be available here. '''To change a bend's die''', click on the die name in the bend's row and click the drop down menu. Select a die from this list. | ||
Revision as of 14:23, 10 June 2013
Contents
Description
The import plug-in allows .step/.stp, .iges/.igs, or .brep part design files to be imported into the software and designed in any of the available part designers.Before a part can be fully imported, it must be defined in the import interface.
How To
To import a .step, .iges, or .brep part, follow these steps:
Start Up
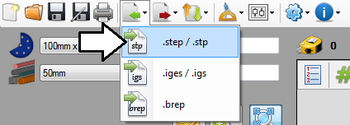
1.) First, click the import menu on the main tool bar and select the file extension of the part that will be imported.
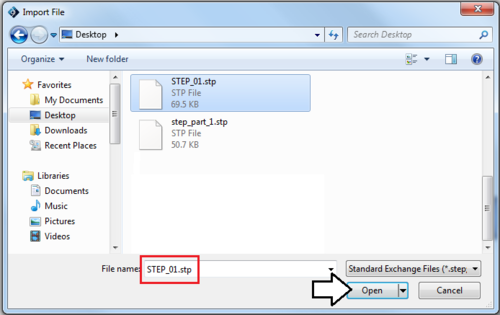
2.) Select a part in the Import File window and click the open button.
Scale
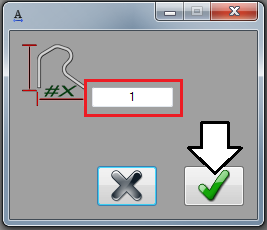
3.) Next, a message box (see image to the right) will open where the scale of the part can be adjusted if necessary. If the part was designed in millimeters, a scale is not entirely necessary. If the part was designed in any other unit other than millimeters, a scale will need to be applied to the part.For example, this can be used to convert parts that were created in inches to millimeters by using a scale value of ".03937". A scale of "1" will mean the part size will remain the same. Increasing or decreasing this scale value will change the size of the entire part. The die and material will also be adjusted accordingly. If the dies and materials available don't match up exactly with the scale provided, the die and material with the closest appropriate sizes will be chosen automatically in the import window.
To adjust the scale, enter a value into the scale field and click the green check to continue.
Import Controls and Options
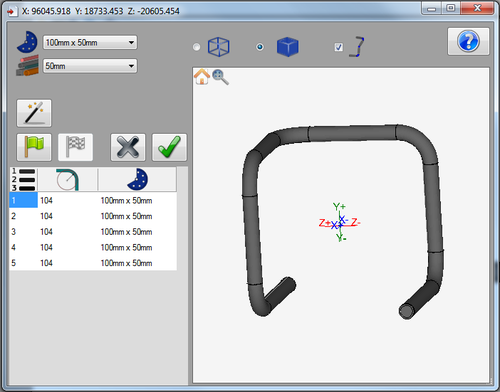
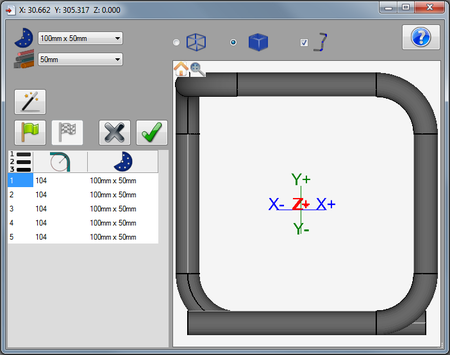
4.) Now, the import window will open. This is where the part will be defined using the definition controls. The material and die used to create the part can be adjusted here as well.In some cases, the part may be automatically defined at this point. To tell if a part has been automatically defined, look at the part in the part display and the bend chart. If the part is shown in the selected material and it's not just the skeleton of the part, and the bend chart has been generated, it has been already defined. See image to the right to see what this would look like. If no adjustments are necessary and the part has been auto defined, the green check button can be clicked at the part will be imported.
If the part is not automatically defined, it will need to be manually defined using the definition tools explained below.
Die/Material Menus and Part Options
In the upper left corner, there are two menus that represent the material and die of the part. To the right of these menus, there will be three part options shown above the part display.
- Die menu: The die chosen here will be the default die that is set in the die library. This die will not necessarily be generated in the bend chart once the part is defined (Unless a part is defined by selecting straight line features - see below). Choosing a different die here will not change the die to the entire part. See the Bend Chart section for information on changing each bend's die after defining a part.
If a part is defined by only selecting straight line features, the die chosen here will be generated in the bend chart after the part is fully defined.
- Material menu: The material of the part can be chosen using the material menu. The part model in the import window will be shown in this material and the part will be imported in this material. To choose a new material, click the drop down menu and select a material from the list. Every material in the material library will be included in this list.
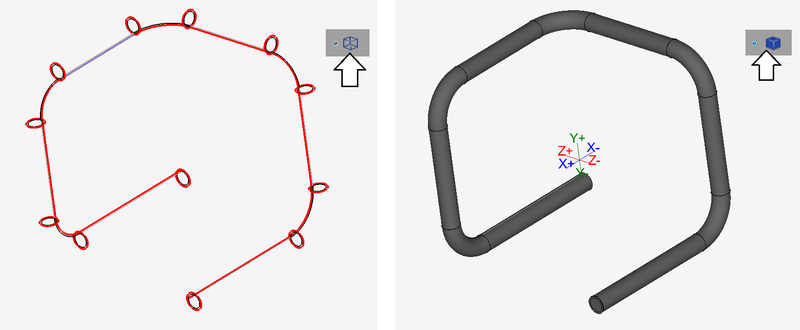
- Wire frame/shaded model: Once the part is fully defined, the part model can be viewed in wire frame or as a shaded model. To switch between these two viewing options, use the wire frame and shaded options shown above the part display.
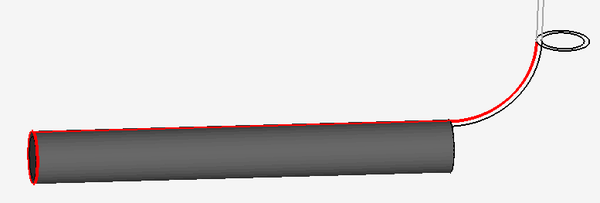
- Show part: While the box next to the show part icon is checked, each section of the part will be generated as the part is being defined. In the image below, the first section of the part has been defined, and since show part is on, the section is shown in the selected material.
Manual Definition
The process of manually defining parts consists of clicking on the part's features. As features are selected, they will be highlighted in red. These highlighted features will be the features that will be included in the final imported part. Each part feature will be represented by lines, shapes, and the outline of the inside and outside diameter of the tube.
To manually define a part, first click the start button. ![]() To select a feature, click directly on the feature. Once selected successfully, the feature will turn red. A feature can be unselected by clicking on it again.
To select a feature, click directly on the feature. Once selected successfully, the feature will turn red. A feature can be unselected by clicking on it again.
Continue moving along the part and selecting each feature until every necessary feature is highlighted in red. Once the part is completely defined, click the finish button ![]() to generate the part, as shown below.
to generate the part, as shown below.
Auto Definition
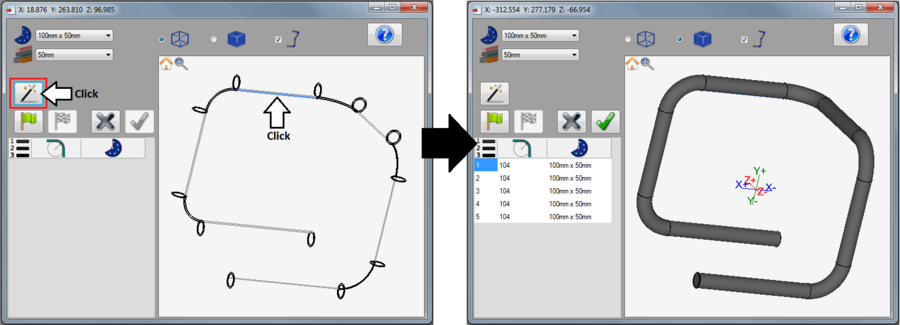
In some situations, the part may be automatically defined. This will work well with very basic parts that only consist of straight lengths and arcs, such as the part in the example image. To auto define a part, first click the auto define button. ![]() After clicking this button, click on any of the feature lines on the part in the part display to the right. If successfully defined, the part will be generated in the chosen material and the bend information will be listed in the bend chart on the left of the window. See image below.
After clicking this button, click on any of the feature lines on the part in the part display to the right. If successfully defined, the part will be generated in the chosen material and the bend information will be listed in the bend chart on the left of the window. See image below.
Bend Chart
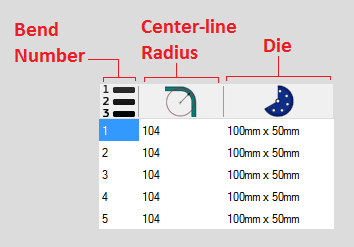
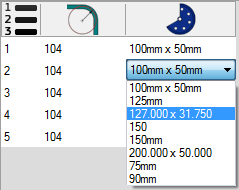
Once the part is fully defined using either of the defining methods, the bend information along with the bend's CLR and the die will be listed in this chart. Each row will represent a bend. The first column list the bend number, the second column will list the CLR of the bend, and the third column will list the die for that bend. The die automatically chosen here will be the best fit for the bend.The ability to choose a die for each individual bend will be available here. To change a bend's die, click on the die name in the bend's row and click the drop down menu. Select a die from this list.
Part Display Controls
The view of the part in the part display can be adjusted using mouse controls and the icons in the upper left corner.
To zoom in and out, use the mouse scroll wheel. Scroll down to zoom in and scroll up to zoom out.
To pan/move the part around, click and hold both mouse buttons and move the cursor around the frame. The part will follow the cursor.
To rotate the part, click and hold down the right mouse button and move the cursor around.
To reset the part to the default view, click the house icon ![]() in the top left corner.
in the top left corner.
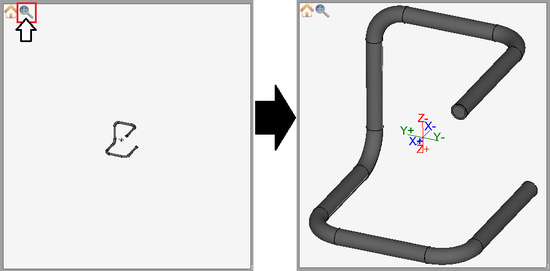
To zoom all the way in on the current part orientation, click the magnifying glass icon ![]() in the top left corner. See image below.
in the top left corner. See image below.
