Difference between revisions of "Manufacture Checking"
| (One intermediate revision by the same user not shown) | |||
| Line 42: | Line 42: | ||
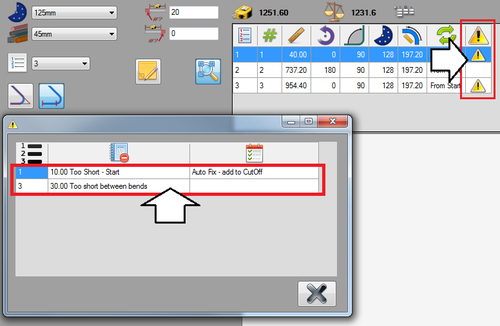
| − | [[File:manucheck05.png|right]]If there are any problems with the design, a warning icon [[File:manucheck04.png]] will be shown in the manufacture checking column in the results table. If a warning is shown, a chart explaining each error can be accessed by clicking on the warning icon. | + | [[File:manucheck05.png|right]]If there are any problems with the design, a '''warning icon''' [[File:manucheck04.png]] will be shown in the manufacture checking column in the results table. If a warning is shown, a chart explaining each error can be accessed by '''clicking on the warning icon'''. |
| Line 52: | Line 52: | ||
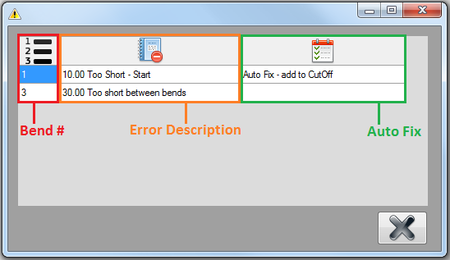
| − | In some instances, a manufacture error can be fixed automatically using an auto fix. If an error can be fixed using this method, an auto fix will be listed in the far right column. An auto fix will state exactly what will be done if it is used. In this example, the starting length is 30 units too short. The auto fix will resolve that problem by adding 30 units to the starting cut off length. To apply an auto fix, double click on the auto fix cell. Once the auto fix has been completed, the error will disappear from the chart. | + | '''In some instances, a manufacture error can be fixed automatically using an auto fix'''. If an error can be fixed using this method, an auto fix will be listed in the far right column. An auto fix will state exactly what will be done if it is used. In this example, the starting length is 30 units too short. The auto fix will resolve that problem by adding 30 units to the starting cut off length. '''To apply an auto fix''', double click on the auto fix cell. Once the auto fix has been completed, the part will be adjusted and the error will disappear from the chart. |
Latest revision as of 08:47, 20 June 2013
Description
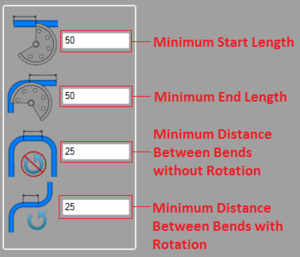
The manufacture checking plug-in allows certain limitations to be set for the die that will need to be met for the part to be successfully created. These limitations include the minimum distance for the first straight length, the end length, the distance between bends. This doesn't include collision checking, but provides a way to ensure enough material is before, between, and after bends.
When a manufacturing error is found, a warning will be displayed in the results table. Another chart with each error will be available. Depending on the error, an auto fix may be available.
How To
Check for Manufacturing Errors
First of all, for the manufacture checking function to be able to properly check for errors, the current die must have the minimum distances supplied. This is done in the die library. See the attributes section on the die library page for more information on these values and how to add them to a die.Once the minimum distances are set, design the part with the die.
In some instances, a manufacture error can be fixed automatically using an auto fix. If an error can be fixed using this method, an auto fix will be listed in the far right column. An auto fix will state exactly what will be done if it is used. In this example, the starting length is 30 units too short. The auto fix will resolve that problem by adding 30 units to the starting cut off length. To apply an auto fix, double click on the auto fix cell. Once the auto fix has been completed, the part will be adjusted and the error will disappear from the chart.


