Difference between revisions of "Export Template"
| (12 intermediate revisions by the same user not shown) | |||
| Line 1: | Line 1: | ||
==Description== | ==Description== | ||
| − | [[File:exporttemp01.png|right|400px]]The export template plug-in allows part information to be exported to a | + | [[File:exporttemp01.png|right|400px]]The export template plug-in allows part information to be [[Export#TXT or Custom Template|exported to a file]] with custom formatting. Each template is designed to contain specific part information and tables. |
Four default/example templates will be included with the plug-in. | Four default/example templates will be included with the plug-in. | ||
| Line 7: | Line 7: | ||
| − | + | [[File:exporttemp20.png]] | |
| − | |||
| − | |||
| − | |||
| − | |||
| − | |||
| − | |||
| − | |||
| − | |||
| − | |||
| − | |||
| Line 26: | Line 16: | ||
'''To access the export template library''', click settings on the main menu bar. Click the export template option in the drop down menu. | '''To access the export template library''', click settings on the main menu bar. Click the export template option in the drop down menu. | ||
| − | [[File:exporttemp02.png| | + | [[File:exporttemp02.png|450px]] |
| Line 42: | Line 32: | ||
===Edit Template=== | ===Edit Template=== | ||
| − | '''To edit a template''', first click on the template's name in the template list on the left side of the window to select it. Once selected, the template name will be highlighted in blue and the | + | '''To edit a template''', first click on the template's name in the template list on the left side of the window to select it. Once selected, the template name will be highlighted in blue and the template's design will be displayed to the right. While a template is selected, it can be edited using the editing functions. |
| Line 64: | Line 54: | ||
[[File:exporttemp05.png|right|350px]]Variables are shown in the variable list on the right of the window. Part attribute and table variables are used as placeholders for the actual part information that will be included in the file. | [[File:exporttemp05.png|right|350px]]Variables are shown in the variable list on the right of the window. Part attribute and table variables are used as placeholders for the actual part information that will be included in the file. | ||
| − | Variables are broken into four categories: Die, Material, Design, and Tables. Each section can be expanded to view the variables by clicking on the '''plus''' [[File:plus.png]] next to the category name. Click the '''minus''' [[File:minus.png]] to collapse the section again. See image to the right. | + | Variables are broken into four categories: [[Die Library|Die]], [[Material Library|Material]], Design, and Tables. Each section can be expanded to view the variables by clicking on the '''plus''' [[File:plus.png]] next to the category name. Click the '''minus''' [[File:minus.png]] to collapse the section again. See image to the right. |
| Line 92: | Line 82: | ||
====Bend Data Settings==== | ====Bend Data Settings==== | ||
| − | The settings listed below the Bend Data Settings heading at the bottom of the window will control what is included in and how information is displayed in an [[File: | + | [[File:exporttemp12.png|right]]The settings listed below the Bend Data Settings heading at the bottom of the window will control what is included in and how information is displayed in an '''$LRA Data Table%''' variable. |
| + | |||
| + | These settings will '''''only''''' have an effect on the '''''current template's LRA table'''''. These settings will also have no effect if there is no LRA table in the current template. | ||
| + | |||
| + | |||
| + | |||
| + | |||
| + | |||
| + | |||
| + | |||
| + | |||
| + | |||
| + | |||
| + | *'''LRA Columns/Rows:''' An LRA table can have up to 6 columns (or rows - if vertical layout is selected). Each column can be adjusted to display the Length/Location, Rotation, Angle, [[Spring-back Charts|Spring Angle]], Bend Length, or Bend CLR. '''To adjust a column''', click the drop down menu next to the column number that will be adjusted. Click on an option in the drop down menu to select it. Select "Blank" to have that column or row not shown in the chart. | ||
| + | |||
| + | [[File:exporttemp14.png]] | ||
| + | |||
| + | |||
| + | |||
| + | |||
| + | *'''Delimiter/Separator:''' The delimiter or separator determines what is placed between each value in the LRA table. A single tab, a double tab, a specified number of spaces, or a chosen series of symbols and/or spaces can be used. '''To change the delimiter''', click on the desired option. If Spaces is selected, the number of necessary spaces must be entered into the field to the right. If Other is selected, enter the the symbols and/or spaces into the field to the right. | ||
| + | |||
| + | [[File:exporttemp15.png]] | ||
| + | |||
| + | |||
| + | |||
| + | *'''Show Bend Numbers:''' Check the box next to Show Bend Numbers to have each bend row labelled with corresponding bend number. | ||
| + | |||
| + | [[File:exporttemp16.png]] | ||
| + | |||
| + | |||
| + | |||
| + | *'''Vertical Layout:''' Check the box next to Vertical Layout to have each bend have a column instead of a row. See image below. | ||
| + | |||
| + | [[File:exporttemp17.png]] | ||
| + | |||
| + | |||
| − | + | *'''Even Spacing:''' Depending on what kind of delimiter is used, it may be necessary to activate even spacing to ensure that the columns align properly for better readability. '''To turn on even spacing''', check the box next to the Even Spacing option. | |
| − | [[File: | + | [[File:exporttemp18.png]] |
====XYZ Data Settings==== | ====XYZ Data Settings==== | ||
| + | [[File:exporttemp19.png|right]]The settings listed below the XYZ Data Settings heading at the bottom of the window control the format of an '''$XYZ Data Table%''' variable. | ||
| + | |||
| + | These settings will '''''only''''' have an effect on the '''''current template's XYZ table'''''. These settings will also have no effect if there is no XYZ table in the current template. | ||
| + | |||
| + | |||
| + | |||
| + | |||
| + | *'''Delimiter/Separator:''' The delimiter or separator determines what is placed between each value in the XYZ table. A single tab, a double tab, a specified number of spaces, or a chosen series of symbols and/or spaces can be used. '''To change the delimiter''', click on the desired option. If Spaces is selected, the number of necessary spaces must be entered into the field to the right. If Other is selected, enter the the symbols and/or spaces into the field to the right. | ||
| + | |||
| + | [[File:exporttemp21.png]] | ||
| + | |||
| + | |||
| + | |||
| + | *'''Show Point Numbers:''' Check the box next to Show Point Numbers to have each row labelled with the corresponding point number. | ||
| + | |||
| + | [[File:exporttemp22.png]] | ||
| + | |||
| + | |||
| + | |||
| + | *'''Vertical Layout:''' Check the box next to Vertical Layout to have each point have a column instead of a row. See image below. | ||
| + | |||
| + | [[File:exporttemp24.png]] | ||
| + | |||
| + | *'''Even Spacing:''' Depending on what kind of delimiter is used, it may be necessary to activate even spacing to ensure that the columns align properly for better readability. '''To turn on even spacing''', check the box next to the Even Spacing option. | ||
| + | |||
| + | [[File:exporttemp23.png]] | ||
| + | |||
| + | |||
====Save Button==== | ====Save Button==== | ||
| + | Whenever any new templates are added or changes are made to a template, the save button [[File:save.png]] must be clicked to save the changes or finalize the template addition. | ||
Latest revision as of 12:04, 19 August 2013
Contents
Description
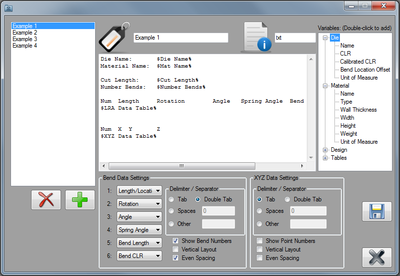
The export template plug-in allows part information to be exported to a file with custom formatting. Each template is designed to contain specific part information and tables.Four default/example templates will be included with the plug-in.
These kinds of files can include die attributes, material characteristics, part design information, an XYZ coordinate table, and/or an LRA data table. Files can also be given custom file extensions.
How To
Start Up
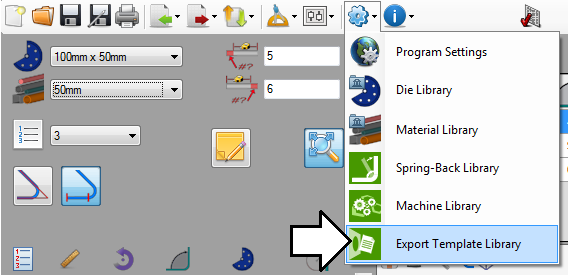
To access the export template library, click settings on the main menu bar. Click the export template option in the drop down menu.
Add Template
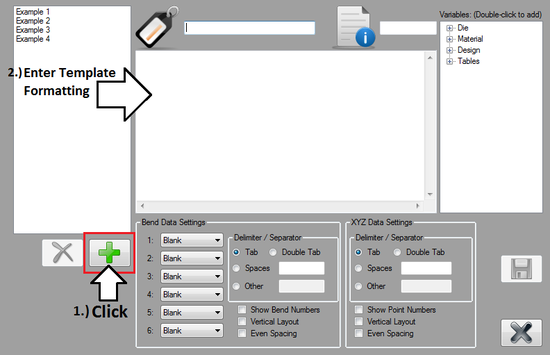
To add a template to the export template library, click the add button ![]() below the template list on the left side of the window.
below the template list on the left side of the window.
Once the add button is clicked the fields will be cleared and template formatting can be added, as shown below.
Edit Template
To edit a template, first click on the template's name in the template list on the left side of the window to select it. Once selected, the template name will be highlighted in blue and the template's design will be displayed to the right. While a template is selected, it can be edited using the editing functions.
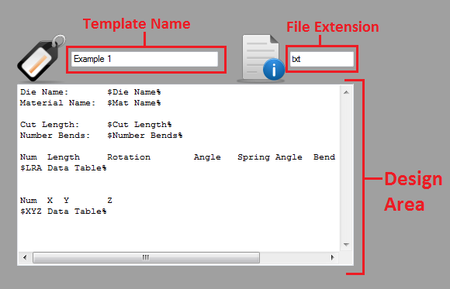
Template Name, Extension, and Design Area
- Template Name: The name given to the template will be shown in the field next to the name tag icon. To change the name of a template, select the template in the template list and enter a new name into this field.
- File Extension: The file extension that will be used when files are exported using the template. For example: txt, dat, prg.
- Design Area: The design area will contain the formatting text and variables and/or tables for the current template. Text can be added directly to this area by clicking within the text frame to place the cursor. Type in information as needed.
Variables
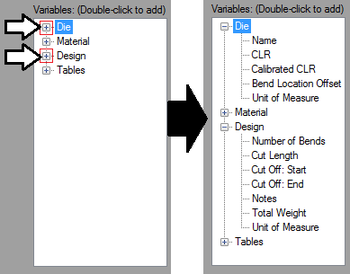
Variables are shown in the variable list on the right of the window. Part attribute and table variables are used as placeholders for the actual part information that will be included in the file.Variables are broken into four categories: Die, Material, Design, and Tables. Each section can be expanded to view the variables by clicking on the plus ![]() next to the category name. Click the minus
next to the category name. Click the minus ![]() to collapse the section again. See image to the right.
to collapse the section again. See image to the right.
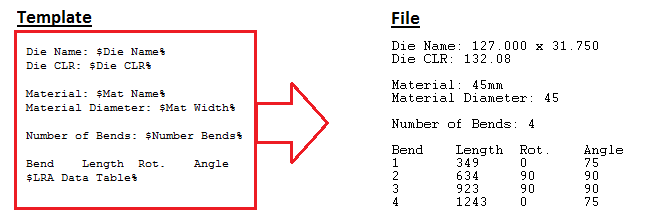
To add a variable to the template, double click on the variable in the variable list. The variable will be placed at the current cursor location in the template design area. Each variable will be surrounded by a "$" and a "%". Be sure to keep these symbols in place as the variable will not appear in the final exported file if either of them are removed accidentally.
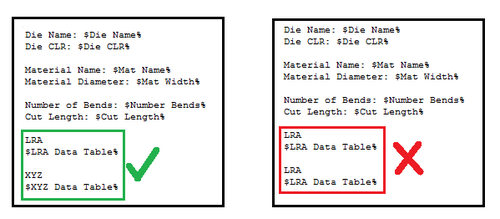
See the image below for an example. In the actual exported file, the die's name and CLR will be placed where the "$Die Name%" and "$Die CLR%" variables are.
Note: Only one of each table can be added to a single temple. For example, one LRA and one XYZ table can be added, but not two LRA tables. See image below.
Bend Data Settings
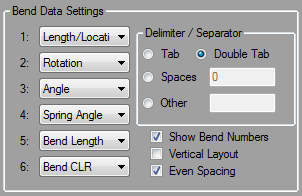
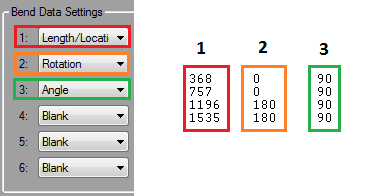
The settings listed below the Bend Data Settings heading at the bottom of the window will control what is included in and how information is displayed in an $LRA Data Table% variable.These settings will only have an effect on the current template's LRA table. These settings will also have no effect if there is no LRA table in the current template.
- LRA Columns/Rows: An LRA table can have up to 6 columns (or rows - if vertical layout is selected). Each column can be adjusted to display the Length/Location, Rotation, Angle, Spring Angle, Bend Length, or Bend CLR. To adjust a column, click the drop down menu next to the column number that will be adjusted. Click on an option in the drop down menu to select it. Select "Blank" to have that column or row not shown in the chart.
- Delimiter/Separator: The delimiter or separator determines what is placed between each value in the LRA table. A single tab, a double tab, a specified number of spaces, or a chosen series of symbols and/or spaces can be used. To change the delimiter, click on the desired option. If Spaces is selected, the number of necessary spaces must be entered into the field to the right. If Other is selected, enter the the symbols and/or spaces into the field to the right.
- Show Bend Numbers: Check the box next to Show Bend Numbers to have each bend row labelled with corresponding bend number.
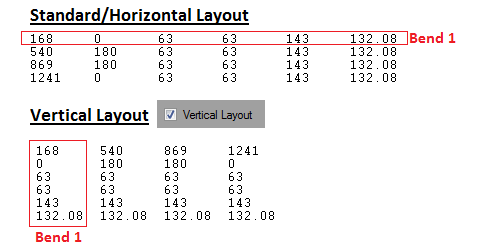
- Vertical Layout: Check the box next to Vertical Layout to have each bend have a column instead of a row. See image below.
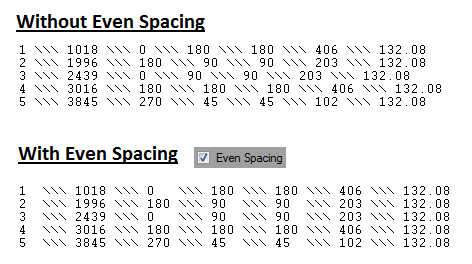
- Even Spacing: Depending on what kind of delimiter is used, it may be necessary to activate even spacing to ensure that the columns align properly for better readability. To turn on even spacing, check the box next to the Even Spacing option.
XYZ Data Settings
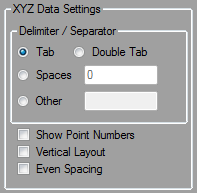
The settings listed below the XYZ Data Settings heading at the bottom of the window control the format of an $XYZ Data Table% variable.These settings will only have an effect on the current template's XYZ table. These settings will also have no effect if there is no XYZ table in the current template.
- Delimiter/Separator: The delimiter or separator determines what is placed between each value in the XYZ table. A single tab, a double tab, a specified number of spaces, or a chosen series of symbols and/or spaces can be used. To change the delimiter, click on the desired option. If Spaces is selected, the number of necessary spaces must be entered into the field to the right. If Other is selected, enter the the symbols and/or spaces into the field to the right.
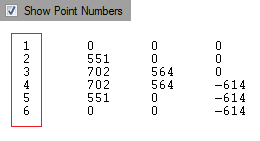
- Show Point Numbers: Check the box next to Show Point Numbers to have each row labelled with the corresponding point number.
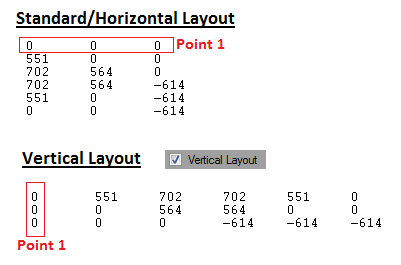
- Vertical Layout: Check the box next to Vertical Layout to have each point have a column instead of a row. See image below.
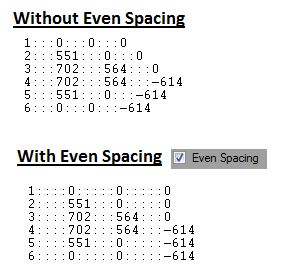
- Even Spacing: Depending on what kind of delimiter is used, it may be necessary to activate even spacing to ensure that the columns align properly for better readability. To turn on even spacing, check the box next to the Even Spacing option.
Save Button
Whenever any new templates are added or changes are made to a template, the save button ![]() must be clicked to save the changes or finalize the template addition.
must be clicked to save the changes or finalize the template addition.
Delete Template
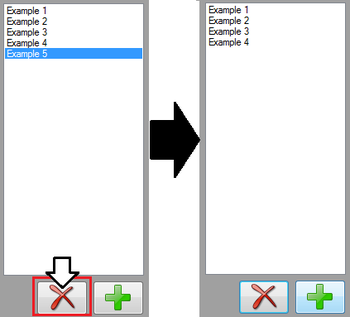
To delete a template from the export template library, first select the template to delete by clicking on it in the template list. Once selected, the template name will be highlighted in blue. Click the delete button ![]() to remove it.
to remove it.
