Difference between revisions of "Template Designer"
| Line 85: | Line 85: | ||
| − | + | ||
| + | |||
===Controls and Options=== | ===Controls and Options=== | ||
| + | [[File:tempentry1.png|right|400px]]'''The 2D part display/entry fields can be adjusted''' using mouse controls and the reset icon. | ||
| + | |||
| + | :*'''To zoom in or out''', use the mouse scroll wheel. First click in the entry fields area, then scroll down to zoom in and scroll up to zoom out. | ||
| + | |||
| + | :*'''To move the 2D part/entry fields''', first click in the entry fields area. Click and hold both mouse buttons and move the cursor around. The part will follow the cursor's movements. | ||
| + | |||
| + | |||
| + | :*'''To reset the entry fields to the default location''', click the reset/home icon [[File:home.png]] in the upper left corner of the entry fields frame. | ||
| + | |||
| + | |||
| + | |||
| + | |||
| + | |||
| + | |||
| + | |||
| + | |||
| + | |||
'''Notes''' can be attached to the part design project using the note button [[File:notes.png]]. Notes are saved with the part and are included on the part's setup sheet. | '''Notes''' can be attached to the part design project using the note button [[File:notes.png]]. Notes are saved with the part and are included on the part's setup sheet. | ||
The '''auto-zoom''' option can be turned on or off using the auto-zoom button '''(On)''' [[File:autozoom.png]] / '''(Off)''' [[File:autozoomoff.png]]. When activated, auto-zoom will zoom in or out to accommodate the size of the part. For example, if a length is originally 200 and is changed to 2000, it may extend past the part display's extend. Auto-zoom will zoom out to make sure the whole part is visible. | The '''auto-zoom''' option can be turned on or off using the auto-zoom button '''(On)''' [[File:autozoom.png]] / '''(Off)''' [[File:autozoomoff.png]]. When activated, auto-zoom will zoom in or out to accommodate the size of the part. For example, if a length is originally 200 and is changed to 2000, it may extend past the part display's extend. Auto-zoom will zoom out to make sure the whole part is visible. | ||
Revision as of 12:51, 21 June 2013
Description
The Template Designer allows parts to be created using preset templates. To design the part, the straight length/dimension values of tube are given and the part design is generated.There are two different versions of this designer:
- The Basic Template Designer has eight common part shapes and each has the option to measure straight lengths from the outside, inside, or center of the tube.
- The Advanced Template Designer has fifty five different part shapes (this includes all of the templates in Basic) with the option to measure straight lengths from the outside, inside, and/or center of the tube (depending on the template).
How To
Start Up
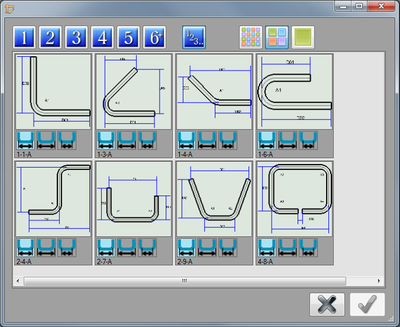
To access this designer, click the template button ![]() on the start up page. This will open up the template selection window.
on the start up page. This will open up the template selection window.
When this window is first opened, the show all button ![]() will automatically be selected. In show all mode, every template available for the current version of the designer will be shown.
will automatically be selected. In show all mode, every template available for the current version of the designer will be shown.
The templates can be sorted by the number of bends they have using the blue number buttons.
For example, clicking the one button will only show templates with one bend, clicking the two button will only show templates with two bends, and the six plus button will show templates with six or more bends.
The change the viewing size of the template tiles in the template selection window, choose one of the size option buttons ![]() . The first button will make the tiles the smallest and the far right button with the green square will make the tiles the largest.
. The first button will make the tiles the smallest and the far right button with the green square will make the tiles the largest.
To select a template, click on the template to highlight it in blue. Once a template is highlighted, a dimension option can be chosen. Select either distance from center ![]() , distance from outside
, distance from outside ![]() , or distance from inside
, or distance from inside ![]() by clicking on the appropriate icon. Note: If necessary, this can be changed after the template is selected in the design interface.
by clicking on the appropriate icon. Note: If necessary, this can be changed after the template is selected in the design interface.
Once the desired template and dimension option is chosen, click the green check button to open a new, blank template design.
Part Design
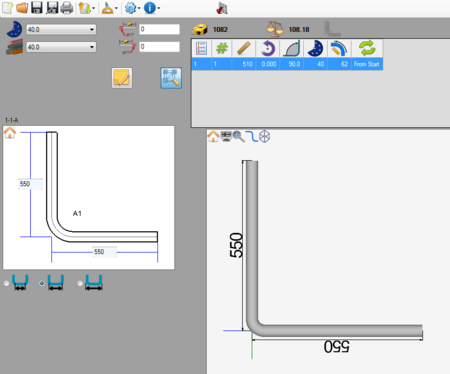
Once a new template part design window has been opened, a new part can be created.
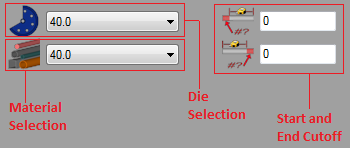
First, a die and material should be chosen. This can be done by clicking on the drop down menus next to the die and material icons in the top left corner of the screen.
If any cut-off is necessary, enter the amount needed into the start and end cut-off fields. The first/top field represents the cut-off at the start of the part and the second/bottom field represents the cut-off at the end of the part.
To change how the dimensions are measured, click on one of the dimension options below the design area (Inside, Center, and Outside respectively) ![]() . These options will determine where the dimensions are placed.
. These options will determine where the dimensions are placed.
- Inside Dimensions: The dimensions will be measured from the inside edges of the tube.
- Center Dimensions: The dimensions will be measured from the center line of the tube.
- Outside Dimensions: The dimensions will be measured from the outside edges of the tube.
Controls and Options
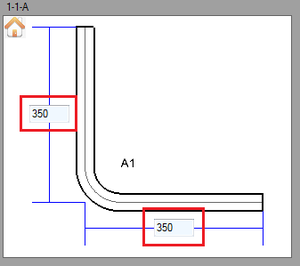
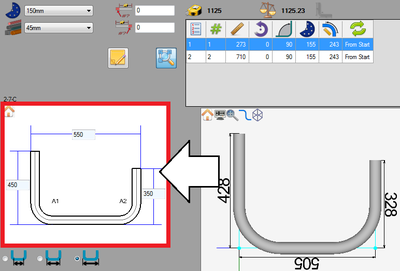
The 2D part display/entry fields can be adjusted using mouse controls and the reset icon.- To zoom in or out, use the mouse scroll wheel. First click in the entry fields area, then scroll down to zoom in and scroll up to zoom out.
- To move the 2D part/entry fields, first click in the entry fields area. Click and hold both mouse buttons and move the cursor around. The part will follow the cursor's movements.
Notes can be attached to the part design project using the note button ![]() . Notes are saved with the part and are included on the part's setup sheet.
. Notes are saved with the part and are included on the part's setup sheet.
The auto-zoom option can be turned on or off using the auto-zoom button (On) ![]() / (Off)
/ (Off) ![]() . When activated, auto-zoom will zoom in or out to accommodate the size of the part. For example, if a length is originally 200 and is changed to 2000, it may extend past the part display's extend. Auto-zoom will zoom out to make sure the whole part is visible.
. When activated, auto-zoom will zoom in or out to accommodate the size of the part. For example, if a length is originally 200 and is changed to 2000, it may extend past the part display's extend. Auto-zoom will zoom out to make sure the whole part is visible.
